Exploiting OAuth 2.0 — Authorization Code Grants

Well, you may have heard of OAuth as a third-party authorization delegation service, but we need a set of test cases and some context. I’ll explain everything you need to know about OAuth from a security standpoint and provide a clear list of test cases so you can report high severity issues on your next engagement.This guide will cover the Authorization Code Grant flow. After reading this article, you should have enough context to devise your own test cases for the remaining authorization flows.
What is OAuth? 😕
OAuth is an attempt to migrate authorization to a third party service. It allows a resource provider (RP), to request access to a user’s resources from an identity provider (IDP) subject to the user’s approval. The RP is usually the website in scope for the engagement and the IDP is usually an external service like GitHub, Bitbucket, or Facebook.
There are multiple different grant types which change the OAuth flow. This blog will document some of the edge cases which should be covered during Authorization Code Grant flows. Follow the char bellow to understand which Grant the service you are testing should use. The required parameters and threat model changes depending on the type of Grant the service uses. 😮
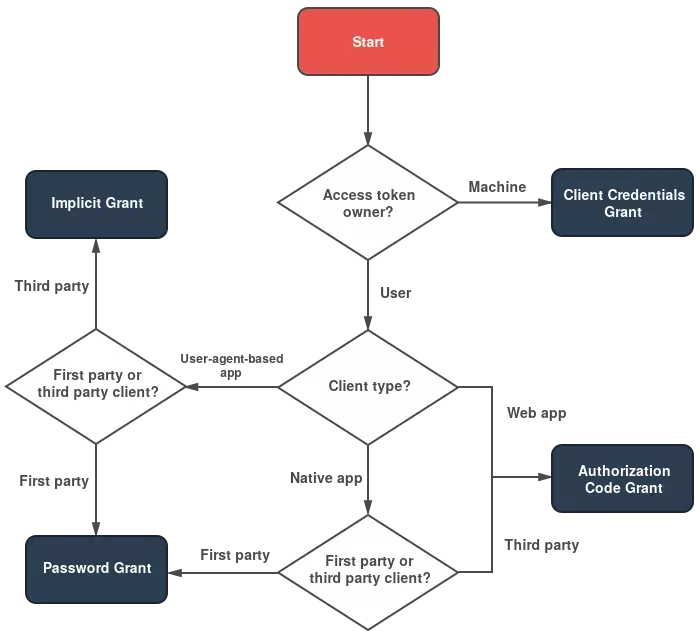
Diagram credit : https://alexbilbie.com/guide-to-oauth-2-grants/#which-oauth-20-grant-should-i-use
The Authorization Code Grant
This diagram succinctly illustrates a typical Authorization Code Grant flow:👇
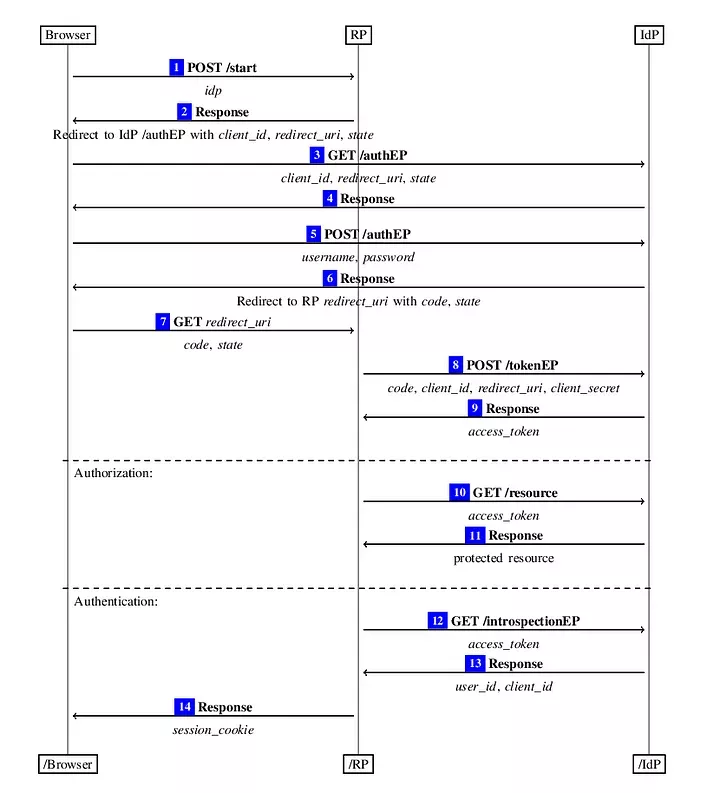
Diagram Credit: https://arxiv.org/abs/1601.01229v4
In this diagram, the RP is the website you will be testing, and the IDP is the identity provider who owns the user’s resources. Let’s walk through each step of the diagram with a bit of hypothetical commentary so the unaltered flow is understood. This gets a bit dense. Understanding these steps in detail is crucial if you want to find issues within the OAuth implementation. If possible I would recommend opening the image and these steps side-by-side so you can refer back and forth as needed. 🔃
The steps below correspond to the steps in the diagram above: ↕️
- The Browser selects a provider, let’s say GitHub, in the application and clicks “Connect to GitHub”.
- The RP receives this request and directs the Browser to the IDP along with a public Client_Id, a Redirect URI and a State.
- The Browser accepts the redirect and goes to the IDP endpoint.
- The IDP responds and asks for the user to authenticate and to approve the scope of the OAuth request (scope here meaning, repo level, admin level…)
- The Browser sends authentication information and approves the scope of the OAuth request.
- The IDP directs the Browser to the Redirect_URI along with the Code and the State.
- The Browser follows the redirect to the RP’s OAuth endpoint and passes along the Code and the State.
- The RP makes a call to the IDP attempting to exchange a Code, Client_Id, Redirect_URI, and Client Secret for an Access Token.
- Don’t confuse this Redirect_URI with the one used in Step2. This will probably not be modifiable as the RP does not send this request through the browser.
- If the Client Secret and Code are valid for the given Client_Id, then the IDP will return an Access Token to the RP.
- Now the RP wants to access the user’s resources. They can simply call the IDP endpoint with the Access Token as a parameter. This is usually done via a custom header.
- If the Access Token is valid, the IDP will return that user’s resources.
Summary of Key Items and Permissions :
Access Token : 🔑
An access token is a multiple use string issued by the IDP which can be directly used to access the user’s resources stored on the IDP.
- An Access Token can be used to directly make requests to the IDP without going through the RP.
- The Access Token should never be seen by the browser, it is secret to the RP.
Authorization Code : 🔐
This code is a single use string which can be combined with a valid State and Client Secret and exchanged at the IDP for an Access Token. You cannot use this code to access a user’s resources at the IDP, it must first be exchanged for an Access Token.
- It’s important to point out here that authorization Code != Access Token. An authorization code cannot be used to directly make requests to the IDP and must be exchanged for an access token by the RP.
- The Authorization Code will be passed from the Browser to the RP, who will exchange it with the IDP for an Access Token.
- ** This Code cannot be used to receive an Access Token from the IDP unless it is paired with the RP’s Client Secret.
Client_Id : 💳
The client_id is unique to each RP and allows the RP to identify itself to the IDP.
- The Client_Id is public and identifies this RP to the IDP.
Client Secret : 📄
The Client Secret is unique to each RP and allows the RP to exchange valid code and state combinations for Access Tokens at the IDP.
- The Client Secret must always be kept secret! If it ever leaks, attackers can subvert the OAuth flow by converting codes into tokens. This allows them to access the resources at the IDP directly instead of accessing them through the RP.
Redirect URI : ▶️
The Redirect URI is the location where the IDP will send the Browser after completing the auth dance. When the Browser is directed here, it will contain the Authorization Code and the State.
- The Redirect URI should be registered with the IDP and constrained to a single value or to a pattern match.
State : 🔯
The State is private and should be unique per OAuth session. It is essentially a CSRF Token and should be protected accordingly.
- The RP must validate that the State received from the Browser is the same as the State sent in step 2 for CSRF protection.
Now you understand how the OAuth 2.0 Code Grant flow should work under ideal circumstances. Let’s enumerate a number of test cases, ranging from least to most complicated, which can derail the process and provide an attacker with advantages.
Test Cases
Insufficient URI Validation:
This is an easy test item, and often one of the most deadly attacks for OAuth. Recall in Step 2. that the Redirect URI should be registered to a single value or in some cases to a pattern match. The key danger here is when the pattern match is insufficiently specified, and allows the Redirect URI to be anywhere within the top level domain.
If any location in the domain allows an attacker to include material (an image link, href etc.) they can often steal the Code and the State from the Referer header. Even worse, because the Redirect URI was not the expected OAuth endpoint, it’s very likely that the code won’t have been consumed for an Access Token yet.
This means an attacker can directly substitute the victim’s Code for their own through the RP in order to manipulate the victim’s resources through the RP. This issue can have an amplified impact if the State value is reused when requests are invalid, as it will allow an attacker to compose a CSRF to substitute attacker resources for the victim’s using the valid state.
Test Steps:
- Select an OAuth provider, Start Intercepting, Press Connect Button.
- Forward until you see a request to the IDP corresponding to Step 2. in the above diagram.
- It’s possible that you won’t see a redirect_uri parameter here. If this is the case, it’s likely registered to a single URI, but you can add it and try anyways.
- Alter the redirect_uri URL parameter and replace it with the top level domain:
- aws.console.amazon.com/myservice → aws.console.amazon.com
- Continue through the OAuth flow, authenticating and granting access.
- If after the OAuth dance, the Browser is redirected to the top level domain, then the site is vulnerable to this attack.
Before marking this issue as high severity, make sure to verify that the site doesn’t trim the Referer header or otherwise strip the URL parameters. Otherwise the Code / State will be difficult to recover and this is just an open redirect. If an XSS can be found anywhere in the site, the code / state can be stolen through JavaScript which checks the URL parameters.
Referer Header Leaks Code + State:
This is a prerequisite to the previous attack; ensure that after the IDP’s redirect to the RP, the Referer header is stripped of URL parameters or even removed if possible. This will prevent the attack scenario detailed above.
Test Steps:
- Select an OAuth provider, Start Intercepting, Press Connect Button.
- Forward through requests and complete the OAuth Flow.
- If at any point after the redirect to the RP, you see the code and state in the Referer header, then the site is vulnerable to this attack.
Access Token Stored in Browser History:
The threat is of medium severity if the access token is stored, but if only the code or state is stored, it’s low severity as the attacker would require some sort of local access to the victim’s machine. Even then, it’s likely that the code has already been redeemed for an access token, so the only real attacks would revolve around stealing a reused state variable.
Test Steps:
- Select an OAuth provider, Press Connect Button.
- Complete an OAuth flow and authorize the scope.
- Open your browser’s history and see if any of the Location entries contain sensitive information.
Other Access Token Leakage:
The severity of this issue is amplified by the fact that scopes cannot (usually) be restricted at the IDP level. It’s solely up to the user to verify that the scope is correct. So an attacker can compose a CSRF attack to change the scope level, steal a code / state through the above attacks, and convert it to an access token in their own browser. This would give them full control over the victim’s IDP resources.
Client Secret Leakage:
If at any point in testing you see the Client Secret, that’s a medium to high severity finding. An attacker with the Client secret is able to convert stolen codes to access tokens, allowing them to bypass whatever limited functionality is available through the service and instead directly hit the IDP with the access approved in the OAuth scope.
Lack of State:
If the RP declines to provide a state variable, which is technically optional as per the spec, they will be placing users at risk of CSRF attacks. Attackers can compose CSRF attacks with modified Redirect URIs and an attacker’s Code to authenticate the victim using attacker resources.
If the victim does not realize that the authentication code has been swapped, they may place sensitive data inside attacker controlled resources. The reason this attack works is because the state parameter in step 2 is unique to a session. If there is no state provided at step 2 of the OAuth flow there is nothing to verify the session token against.
Test Steps:
- Select an OAuth provider, Start Intercepting, Press Connect Button.
- On the initial request to the IDP, verify that the state value is passed as a URL parameter.
- Continue stepping through the OAuth Flow until the Redirect URI is reached.
- Ensure that the Redirect URI has the state as a URL parameter.
- Ensure that if the service has multiple OAuth Endpoints or bounces after the Redirect URI, that the final hop actually passes the state to the backend RP.
Insecure State:
Test Steps:
- Select an OAuth provider, Start Intercepting, Press Connect Button.
- On the initial request to the IDP, view the State value passed as a URL parameter.
- Repeat this process, verifying that the State variable has sufficient entropy and is not otherwise predictable.
Reused State:
If an attacker only has access to a victim’s State, they can compose a CSRF attack and use an attacker code in order to authenticate the victim using attacker OAuth resources. This is usually a medium severity issue but use your best judgment as the severity is tightly linked to the ease of leaking a state variable.
Test Steps:
- Select an OAuth provider, Start Intercepting, Press Connect Button.
- On the initial request to the IDP, view the State value passed as a URL parameter.
- Repeat this process, verifying that the State variable has been changed between requests.
- It’s important to test this in the case that OAuth succeeds and in the case where OAuth fails, either because the user rejected the scope, or because the Redirect URI didn’t go to the expected RP OAuth Endpoint.
Invalid State Validation:
Alternatively, sometimes an attacker can omit the state variable and the request is treated as correct. This test is to ensure that all of the state is validated, and there are no bypasses which can be performed by simply ignoring the state.
Test Steps:
- Select an OAuth provider, Start Intercepting, Press Connect Button.
- On the initial request to the IDP, modify the State parameter passed as a URL parameter by changing it to an invalid value.
- Complete the OAuth Flow, and validate that the returned code and invalid state are rejected by the RP.
- Repeat steps 1–3 but omit the state variable altogether. Ensure that the RP rejects the response from the IDP.
Reusable Authorization Codes:
Test Steps:
- Complete an entire OAuth process. Track the authorization code provided by the IDP, save this value.
- Select the same OAuth provider, Start Intercepting, Press Connect Button.
- Complete the OAuth Flow, and validate that the returned code is different from the code received in step 1.
- Replace the returned code with the code saved in step 1.
- Ensure that the OAuth process fails, either via rejection from the RP or the IDP.
Access Token Stored in JavaScript:
Developers will occasionally assume that this information is secret and will store the OAuth Access Token in the framework state. This can be stolen by an attacker and used to convert a victim’s authorization code and state into a usable access token which is leaked through these JavaScript objects. Test steps here will vary per framework and implementation.
Implicit Grant Coercion:
Fun fact: Facebook by default allows for the Code workflow as well as the Implicit (called Token on Facebook) grant. Just something to keep in mind.
Test Steps:
- Select an OAuth provider, Start Intercepting, Press Connect Button.
- On the initial request to the IDP, modify the response_type value passed as a URL parameter by setting it equal to: “token”.
- Continue through the authorization flow, forwarding requests until the Redirect URI is reached.
- If a raw Access Token is returned here, then the IDP is vulnerable to this attack.
307 Redirect Attack:
The 307 status code will have the user’s Browser send a POST request to the RP containing all of the form information, including the user’s credentials!
Test Steps:
- Select an OAuth provider, Start Intercepting, Press Connect Button.
- Continue through the authorization flow until the moment when the user logs into the IDP.
- Find the request redirecting the Browser to the Redirect URI. If this request uses a 307 response code, then the IDP is vulnerable to this attack.
Afterword
If this guide was helpful to you, or if you have comments about this article, please feel free to reach out.
Resources and References:
Practical Exploitation:
If you want to read about real world exploitation of different OAuth bugs here are a few from the expert in OAuth hacking:
- http://blog.intothesymmetry.com/2016/11/all-your-paypal-tokens-belong-to-me.html
- http://blog.intothesymmetry.com/2015/06/on-oauth-token-hijacks-for-fun-and.html
- http://blog.intothesymmetry.com/2015/10/on-oauth-token-hijacks-for-fun-and.html
- http://blog.intothesymmetry.com/2014/04/oauth-2-how-i-have-hacked-facebook.html
- http://blog.intothesymmetry.com/2014/04/oauth-2-how-i-have-hacked-facebook.html
Additional Resources:
- https://arxiv.org/pdf/1601.01229 — Highly recommend reading the first 15 pages of this, very clear and succinct explanations.
- https://tools.ietf.org/id/draft-ietf-oauth-security-topics-05.html — Official security recommendations from IETF
- https://sakurity.com/oauth — Very opinionated, but describes a number of useful attacks
- https://dhavalkapil.com/blogs/Attacking-the-OAuth-Protocol/ - https://homakov.blogspot.com/2014/02/how-i-hacked-github-again.html
- https://gist.github.com/mziwisky/10079157
- https://www.manning.com/books/oauth-2-in-action
- http://homakov.blogspot.com/2012/08/oauth2-one-accesstoken-to-rule-them-all.html
- https://www.ory.sh/sign-in-with-user-impersonation-oauth2-openid-connect — Very neat trick where changed usernames can be used for account takeover
- https://hackerone.com/reports/405100 — Bypassing the filters of the redirect_uri can be very dangerous
- https://hackerone.com/reports/215381 — Twitter OAuth bug
- https://hackerone.com/reports/46485 — Twitter access_token with OAuth can be used on multiple users
🍸 STAY CURIOUS 🍸